Golf

Course Tour

Spectacular Golf At Every Turn

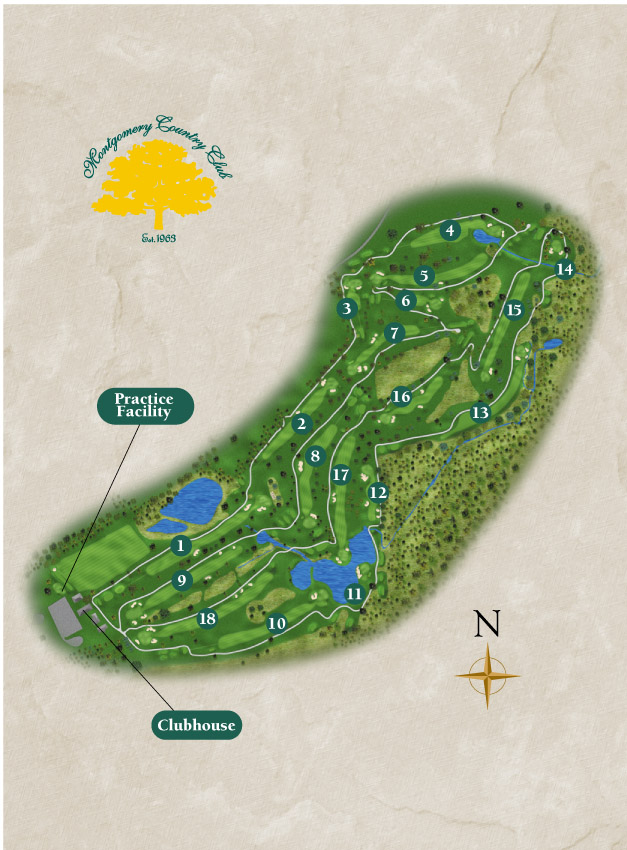
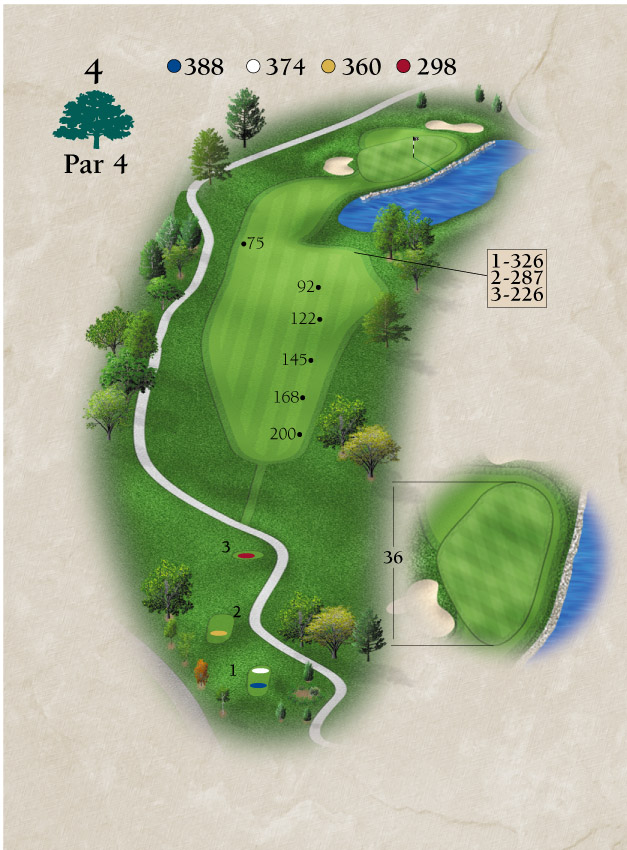
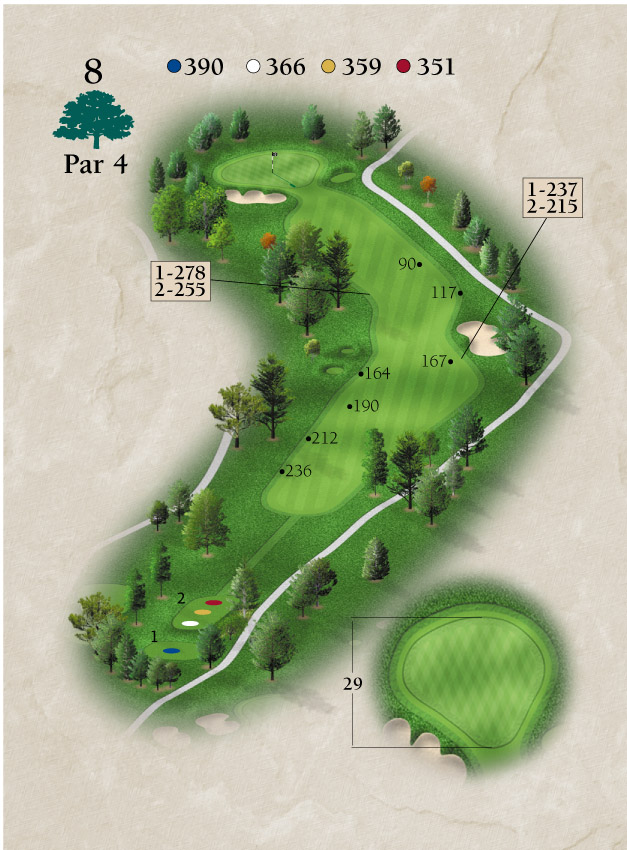
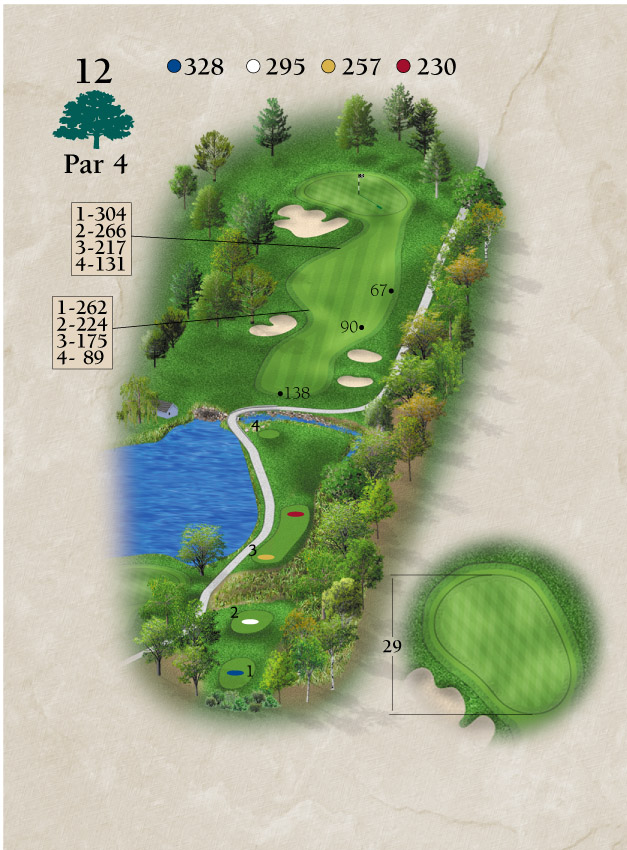
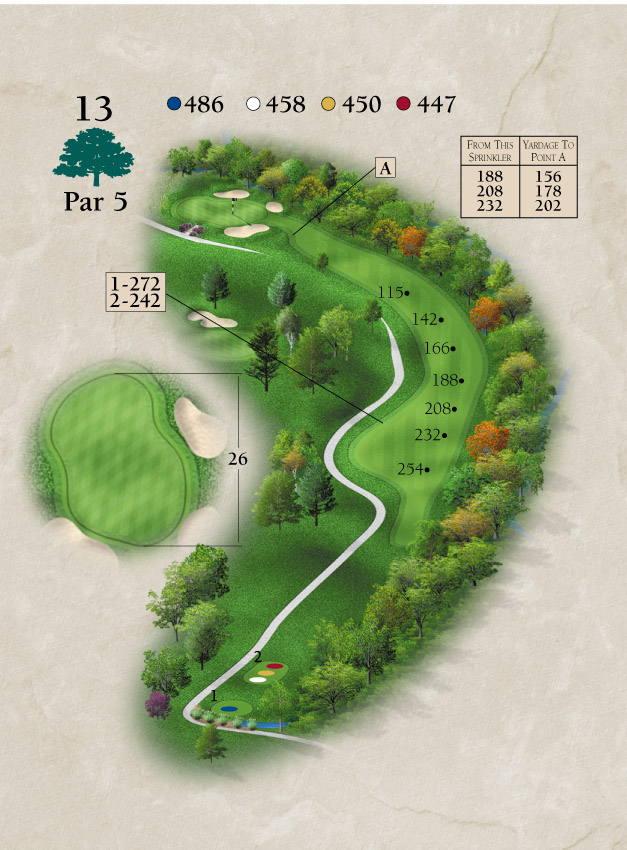
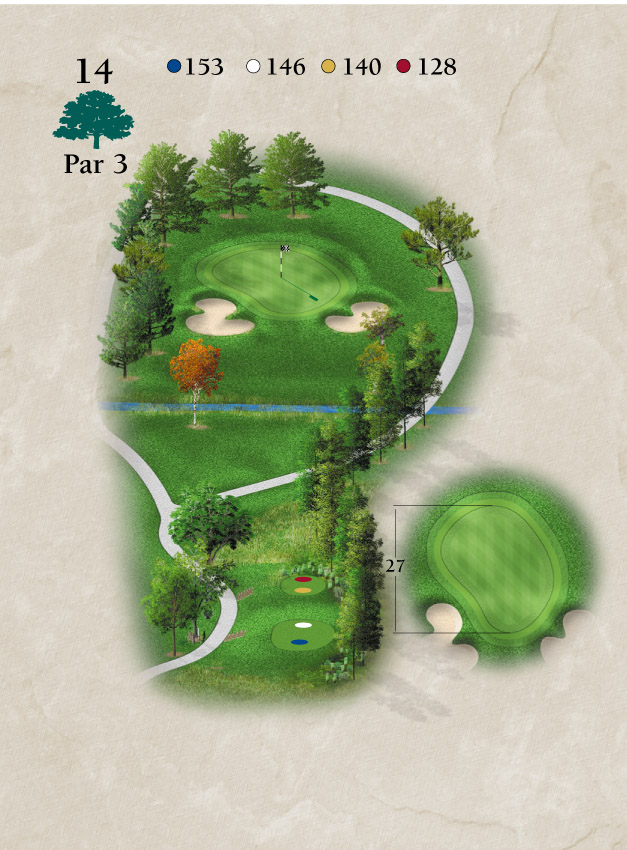
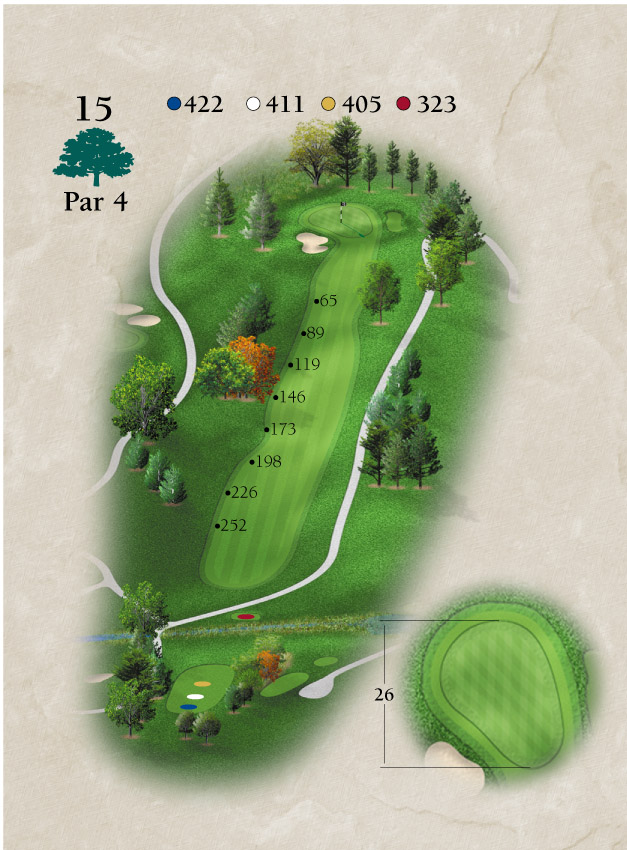
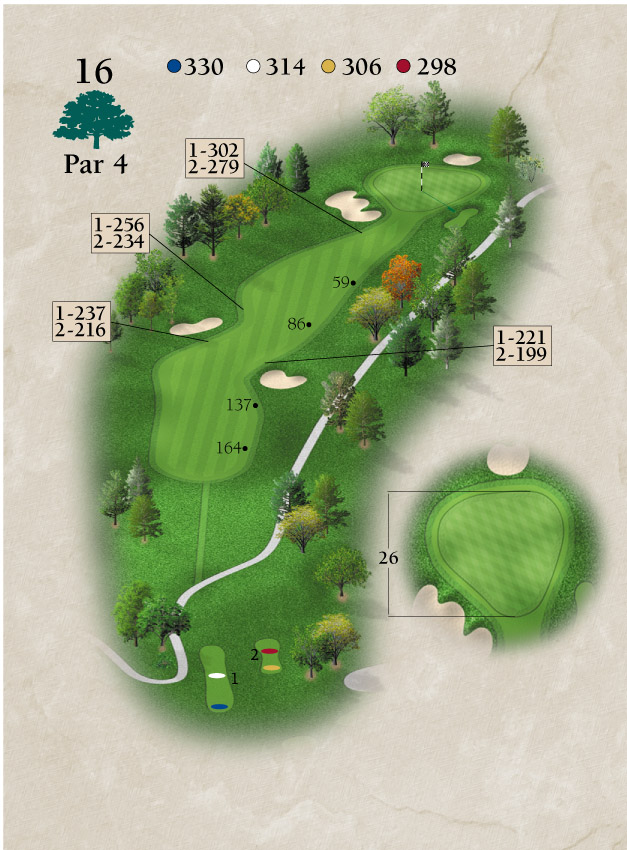
Montgomery Country Club's par-72, 6,700-yard championship layout was designed by golf course architect Edmund Ault to blend seamlessly with its pristine natural surroundings in the rolling hills of Laytonsville. Thick stands of mature trees frame rye grass fairways and large, pristine greens, with seven beautiful water features, lovely flora and fauna, and unique bunkering creating both strategic diversity and a stunning backdrop for golf. While challenging for scratch golfers, multiple tees on each hole enable golfers of all ages and abilities and opportunity to enjoy this hidden golf gem.

Maintained to premium standards all season long, the club is one of the most sought-after locales in the state of Maryland for championship golf competition. The club served as host of a Kemper Open qualifying event and as a local qualifying site for the 1994 U.S. Open, along with numerous regional and state championships - including the Maryland State Golf Association (MSGA) Senior Women’s Amateur, Middle Atlantic PGA Match Play qualifier, the MSGA Senior Open, the Mid Atlantic Golf Association Mid-Amateur, the MSGA Men’s and Women’s Mid-Amateur Championships, the MAGA Four Ball Championships, the WMGA Metropolitan Young Amateurs and the MSGA One Day 4-Ball Amateur Event among many others.

Complementing the course is an expansive golf practice facility including a driving range and short game area - the perfect setting for perfecting every aspect of one's game in a serene, peaceful setting, as well as a comprehensive golf instructional program for juniors and adults taught by top PGA teaching professionals. To learn more about golf instruction, please click here.

COURSE OVERVIEW

Map of the Course

Walkthrough

Our 18 Hole Course

 
Layout for Hole Number 1

The opening hole is a great opportunity to get off to a solid start. The drive on this straightaway par-5 should favor the right half of the fairway. Longer hitters will have an opportunity to hit this green in two while most players will lay-up with a club of their choice. A lay-up leaves a short uphill shot to a green that slopes from back to front.

Blue 526
Gold 487
Par 5
Red 456
White 495
Layout for Hole Number 2

The second hole is an uphill, straightaway par-4 that demands a precise tee shot to a skinny fairway. A good tee shot will leave players with a mid iron into another green where it pays to have an uphill putt. The miss here is definitely short!

Blue 390
Gold 358
Par 4
Red 347
White 359
Layout for Hole Number 3
The third hole is a fun, short par-3 that can demand a variety of shots depending on the placement of the hole. The miss on this hole is certainly short, as hitting a tee shot over the green always means bogey.
Blue 150
Gold 133
Par 3
Red 127
White 139
Layout for Hole Number 4
The fourth hole is one of the most exciting holes on the golf course. With nowhere to miss a tee shot left or right, hitting the fairway is only the start. The second shot isn’t necessarily a long one, but one that requires ultimate precision while hitting over the water. The miss here is long and right, but don’t think this leaves an easy third!
Blue 388
Gold 360
Par 4
Red 298
White 374
Layout for Hole Number 5
The fifth hole is one of the best par-4's in Montgomery County! This uphill challenge that can stretch itself out to 440 yards will play even longer. The fairway bunker seen from the tee boxes tends to be a perfect target for all players. Longer players will face a long iron or fairway wood second shot while most players end up taking three shots to hit this severely sloped back to front green. This #1 handicap hole truly is the hardest on the course.
Blue 432
Gold 394
Par 4
Red 342
White 404
Layout for Hole Number 6
The sixth hole is a great par-3 that will require most players to hit a long iron into what is a very large and fair green. With that being said, there is not a very favorable place to miss this green...but players should have a reasonable opportunity to make par from wherever their tee shot lands.
Blue 185
Gold 166
Par 3
Red 152
White 172
Layout for Hole Number 7
The seventh hole is a dogleg-left par-4 that gives some players a decision to make on the tee box. Longer players may hit a fairway wood or hybrid iron towards the bunkers or cut the corner with a driver. Most players will hit driver towards the middle of the fairway bunkers for an inviting second shot. The key to this tee shot is to not go left, where one will be severely blocked out from the green. Miss your second shot short, as it leaves an easy chip or uphill putt.
Blue 360
Gold 322
Par 4
Red 307
White 332
Layout for Hole Number 8
The eighth hole is another dogleg-left par-4 that demands more length off the tee, keeping the drive just left of the fairway bunker. A good tee shot on this hole leaves an approach that will give players a chance to go for the pin! This is yet another hole where too long of an approach means trouble.
Blue 390
Gold 359
Par 4
Red 351
White 366
Layout for Hole Number 9
The ninth hole is a great straightaway par-5 that entices players to go for birdie before they make the turn. A tee shot that splits the bunkers on both sides of the fairway allows players to think about going for it in two or giving themselves a comfortable distance for a third shot that absolutely must stay underneath the hole!
Blue 509
Gold 477
Par 5
Red 435
White 487
Layout for Hole Number 10
The tenth hole’s beauty isn’t necessarily seen until its approach shot, so be sure to hit a driver that splits the middle of the fairway - as this lengthy par-4 is too hard to play from the left or right roughs. The downhill approach with the water backdrop looming is one to test all players. Anywhere on the putting surface is a great second shot, but miss this approach short right for an opportunity at par.
Blue 456
Gold 399
Par 4
Red 348
White 424
Layout for Hole Number 11
Not only is the eleventh the most picturesque of all the par-3s, but it is certainly the most challenging. For most players, this hole requires long irons and fairway woods to a small, peninsula shaped green. Anywhere on or near the putting surface is sure to be considered a success.
Blue 213
Gold 149
Par 3
Red 150
White 156
Layout for Hole Number 12
Don’t let the length of the twelfth hole trick you into thinking it’s a breeze! This short par-4 often plays one of the hardest on the course with out-of-bounds right and trees left. A smooth tee shot with any club that makes it to the fairway is a wonderful option. Players will be left with a short iron uphill shot to another back-to-front sloped green.
Blue 328
Gold 257
Par 4
Red 230
White 295
Layout for Hole Number 13
Often considered a signature hole on the course, the thirteenth gets players thinking birdie. This reachable par-5 first requires an exciting tee shot as players descend into the fairway. The gutsy move is to hit the long second into a green that players may not be able to see but should trust is there! A lay-up shot to the right leaves an easy third. Either way it’s played, three good shots will leave a birdie opportunity.
Blue 486
Gold 450
Par 5
Red 447
White 458
Layout for Hole Number 14
The fourteenth hole is another solid par-3 that requires some definite precision. This is a hole where players often see their approach shot land on the green and end up either short, long, or most often right, as this sloped green may be easy to hit but not to hold. No matter where the hole location is, the best shots tend to be in the middle left part of the putting surface.
Blue 153
Gold 140
Par 3
Red 128
White 146
Layout for Hole Number 15
The lengthy par-4 fifteenth hole is often considered the second hardest hole on the course. While the hole is straightaway, the tightly cut, sloped fairway always seems elusive. Hitting the fairway is only the start as this is possibly the hardest approach on the course. Players will face a lengthy second to a right-to-left sloped green where the only miss is just short.
Blue 422
Gold 405
Par 4
Red 323
White 411
Layout for Hole Number 16
Players should ignore the fairway bunkers on the sixteenth’s tee shot and aim directly at the left greenside bunker in the distance. A well-placed tee shot at this short par-4 will have players looking for a birdie and the start of a good finish. This short approach is into a green that proves to be another one of Montgomery’s to miss short and not long.
Blue 330
Gold 306
Par 4
Red 298
White 314
Layout for Hole Number 17
Almost home! But don’t rush, because many say the seventeenth is the most exhilarating hole on the course. This lengthy par-4 gets players headed in the direction of the left fairway bunker from the tee box. The second shot is a mid to long-iron approach with the green set back against the water. Players will be rewarded for hitting this green in regulation, as it is one of the flattest on the course.
Blue 434
Gold 397
Par 4
Red 349
White 403
Layout for Hole Number 18
While not a reachable par-5, there is not an abundance of trouble, which gives players the opportunity to set themselves up with a comfortable third shot. Start with a tee shot anywhere left of the fairway bunkers to give yourself the opportunity to hit a fairway wood second up the left side of the fairway. From this position, players will have the third they are looking for and hopefully, a chance to end a spectacular day with a birdie.
Blue 561
Gold 494
Par 5
Red 408
White 504